In this guide we’ll walk through setting up Tailscale’s experimental Identity Provider (tsidp) inside a lightweight Debian Proxmox container. We’ll create the container, install Go, build the binary, configure systemd with environment variables, and run tsidp as a dedicated user.
This is a very raw howto, copy paste ready, based on my attempts, target audience is homelaber. Comments welcome !
I run an Intel NUC Gen 8 boxes (NUC8BEB, NVMe + HDD, 32 GB RAM) in my Proxmox 8 cluster (Issue is the same on PVE9). I randomly hangs — sometimes in 15 min, sometimes after a few hours. No ping, no display, useless logs.
Root Cause
It’s likely an iGPU power management bug (Intel HD Graphics, Kaby Lake Refresh). A random facebook post mentionned i915.enable_dc=0 disables GPU power management and should stops random hangs. I double checked and tested….
Recently migrated my homelab ESXi to Proxmox VE, and while things mostly went smoothly, one node would randomly hang (mostly during large transfers or under sustained network load but sometimes when idling…). I plugged in a monitor to check logs and… confirmed the cause with a quick dmesg:
e1000e: Detected Hardware Unit Hang
Turns out this has been a known issue for years with Intel e1000e NICs (like I217-LM, I219-V, 82574L, etc.). These “aging” chips choke when offload features are enabled under modern workloads.
This is an unsupported modification and may void your warranty. Proceed at your own risk. Configuration WILL revert after DSM updates.
But why ?
Synology reserves eSATA ports for their own brand external expansion units, and DSM explicitly prevents drives connected through those ports from being used as SSD caches. The setting responsible for this behavior is called esataportcfg, found in the system configuration files.
The esataportcfg setting tells DSM which physical SATA ports should be treated as eSATA ports — usually for external expansion units like DX517.
It’s written in hexadecimal (e.g. 0x4) but actually represents a bitmask: a binary number where each bit corresponds to a SATA port on the motherboard.
0x4 is hexadecimal for binary 0100. This means:
Port 0: 0 = Not eSATA
Port 1: 0 = Not eSATA
Port 2: 1 = eSATA
Port 3: 0 = Not eSATA
DSM will treat only port 2 ( sdc ) as eSATA, and ignore it for caching, system volumes, and other features limited to “internal” drives.
This is useful if you want to explicitly allow or deny eSATA functionality for certain ports — for example, if you’re using a third-party eSATA dock or expansion device and want DSM to handle it differently. ( I have NOT tried that yet !)
The “hack”
Enable SSH in DSM: Control Panel → Terminal & SNMP → Enable SSH service
SSH into your NAS: ssh romain@synology
Edit the config files: sudo vi /etc.defaults/synoinfo.conf If it exists, also edit: sudo vi /etc/synoinfo.conf
Find the line: esataportcfg="0x4" And change it to: esataportcfg="0x0"
Unmount ISCSI & Reboot your NAS: sudo reboot
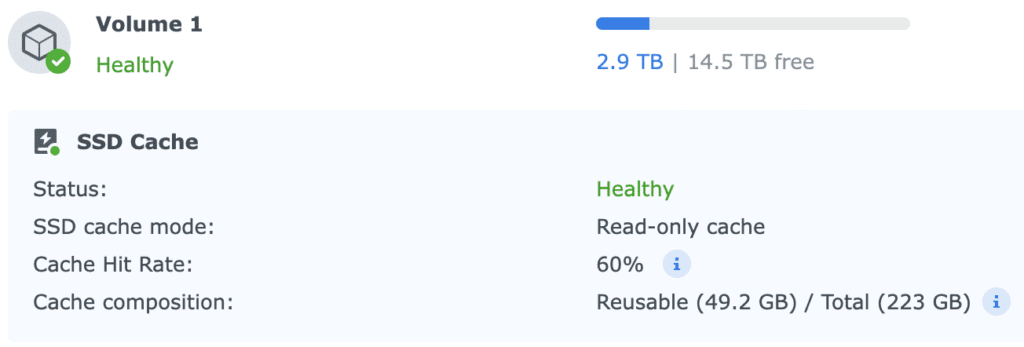
After Reboot: Enable SSD Cache
Once DSM is back online:
Go to Storage Manager → SSD Cache
Select your connected SSD (formerly on the eSATA port)
Create a read or read-write cache as desired
DSM should now accept the drive as a valid caching candidate.
Notes
This trick works best on models with physically exposed eSATA ports not already assigned to expansion bays.
DSM updates may overwrite synoinfo.conf. Consider making a backup.
This workaround does not make sense if you have M.2 slots — use those instead for best performance.
Here’s a straightforward docker-compose setup for running WordPress locally on my M1 Macbook, with persistent data, mapped plugins directory, and custom PHP upload settings. I use it as a Dev environnement but should work for prod with minor changes.
If you’re like me and have attempted to back up your Synology NAS to a friend’s server for an additional offsite backup, you may have encountered some challenges in the process. However, connecting the two is actually quite straightforward once you understand the steps involved.
The only step here is to modify the GRUB configuration file to the turn screen off after a timeout. This file, located at /etc/default/grub on most Debian and Ubuntu-based distros, contains the kernel parameters that your system uses during startup.